
Home Theater Speaker Placement
Posted by Dave Pedigo on 16th Apr 2020
One of the questions that arises for home theater enthusiasts is “where exactly should I place my speakers?” Speaker locations are very standardized, except when adding overhead speakers, which is called immersive audio. In this article, we are going to discuss how to figure out exactly where to place your speakers. Because this can get complicated quickly, this article addresses only the placement of speakers for 5.1 and 7.1 surround systems. These two legacy formats matter a great deal because the placement of these speakers is the same when adding immersive formats such as Dolby Atmos. These layouts are the foundation for all movie audio you enjoy in a commercial theater as well as at home. In a future article, we will discuss adding the overhead speakers. We are also going to leave subwoofer placement for another article as it requires a lot of attention to separate the fact from opinion.
The Perfect Room
Before we dive into the subject, please note that almost everyone reading this article will have some challenges in their room. Some problems could be columns, windows, or doors in the way preventing proper speaker placement. The reality of home theater is that there will always be challenges requiring compromise. If you need to make a compromise based on the room, it is OK. Just do your best, and if you can, take the time to listen to several options and use the one that works the best.
Main Listening Position
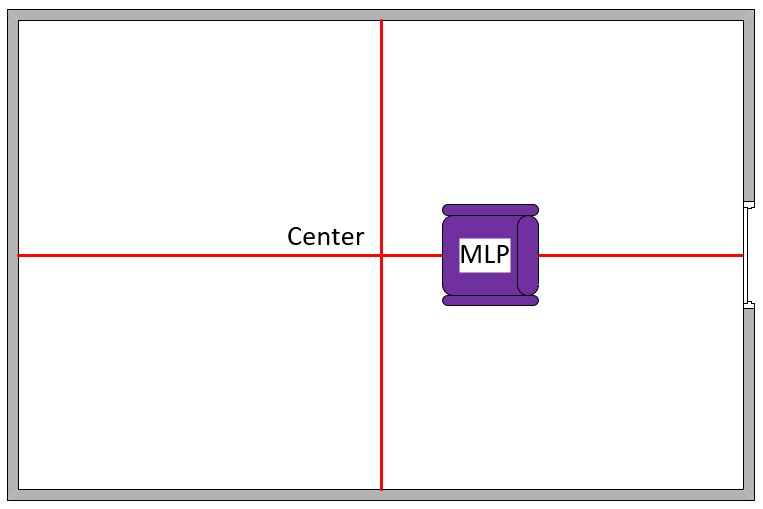
The first step for identifying speaker placement is establishing the main listening position (MLP). For home theater, center the MLP on the short wall and locate it a minimum of 18” behind the centerline, as shown in Figure 1. The MLP is critical, as it determines speaker location based on specific angles. It’s important to note that the center channel and the left and right channels are a constant and thus do not change based on 5.1, 7.1 or any immersive audio formats.
Left, Center & Right (LCR)
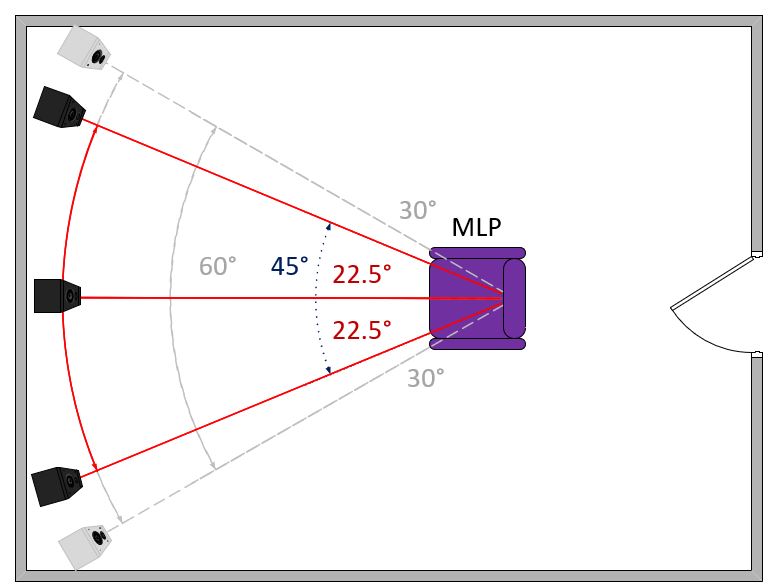
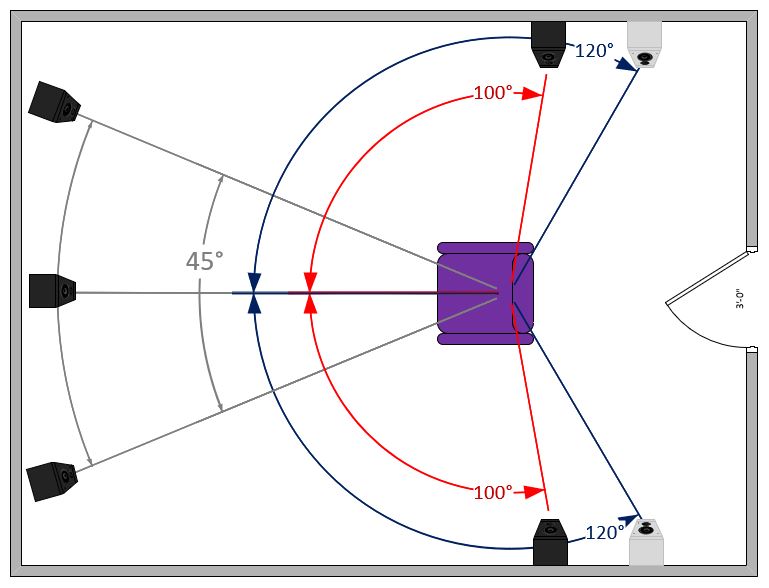
When placing the center channel, center the speaker on the wall horizontally. The tweeter should be perpendicular to the center of the room and as close to ear height as possible. The left and right speakers should be between 22.5° and 30° from the center channel at the MLP. In figure two, there are two variations, 22.5° in red with black speakers and 30° with light grey speakers. 22.5° forms a 45° angle between the left and right speakers, while 30° forms a 60° angle. If watching movies is the primary purpose of the room, use 22.5°. If dedicated music listening is also essential, 30° is better.
Calculating the distance for the left and right speakers
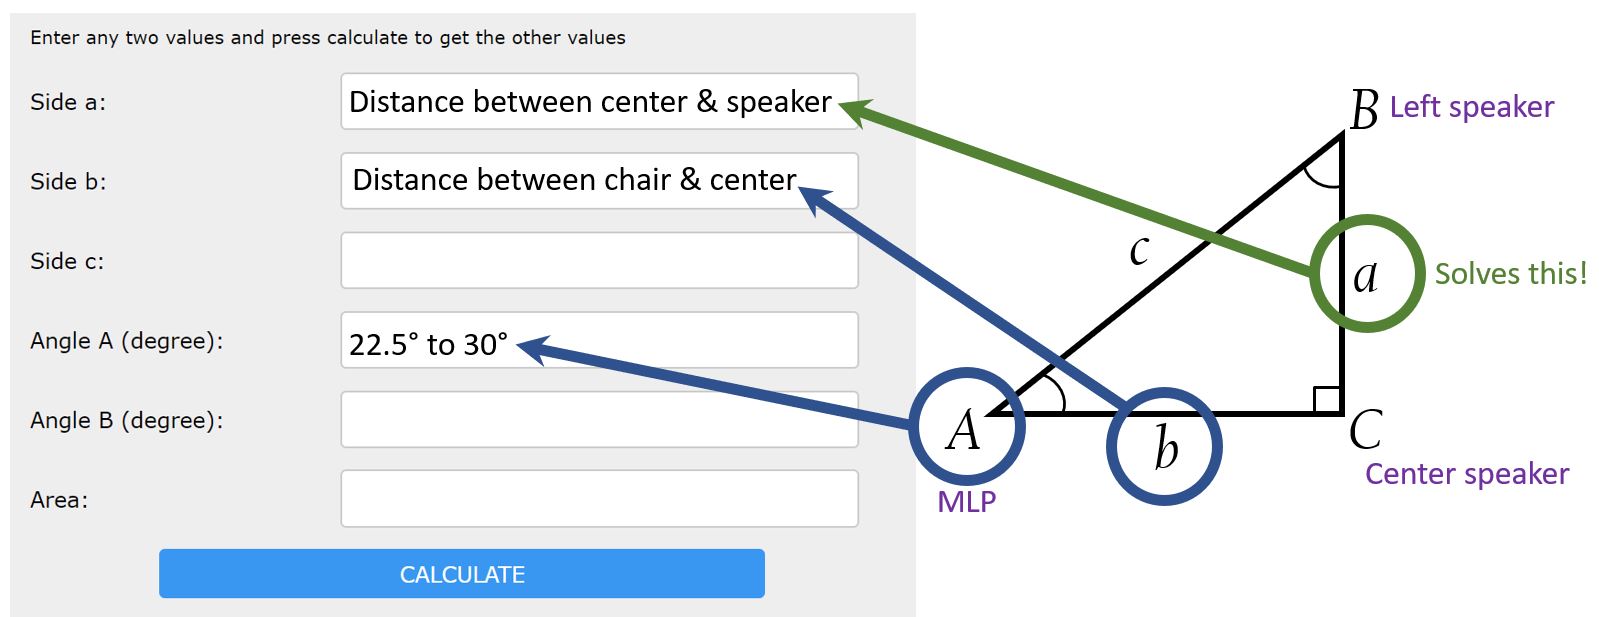
Auralex acoustics recommends using a right-angle calculator, unless you are a trigonometry whiz. We used https://everydaycalculation.com/right-triangle-calculator.php for this article, but there are many others available. In looking at Figure 3 below, you will see that you only need to enter two figures: the distance between the center channel and MLP (side b) and the desired angle (Angle A). From there, just hit calculate, and the results magically appear. The results for “side a,” is the distance between the center channel and your left or right speaker.
Example 1: Left and Right Speakers
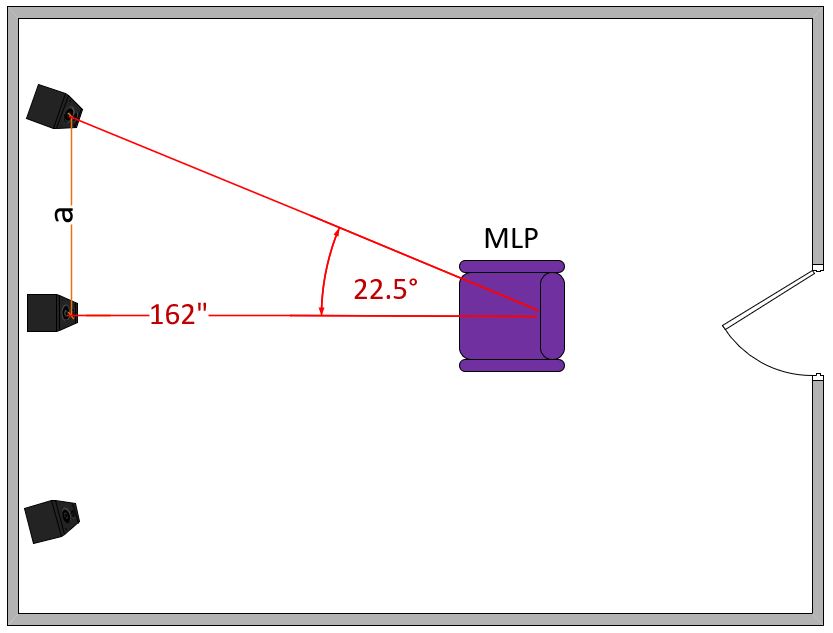
In this room, the MLP is located 162” from the center speaker. Enter 162, which is the distance in inches, to the “side b” box. Then enter 22.5 to “Angle A” box. Once complete, click calculate. The results appear below, shown in the red box in Figure 5, which comes out to 67.1”.
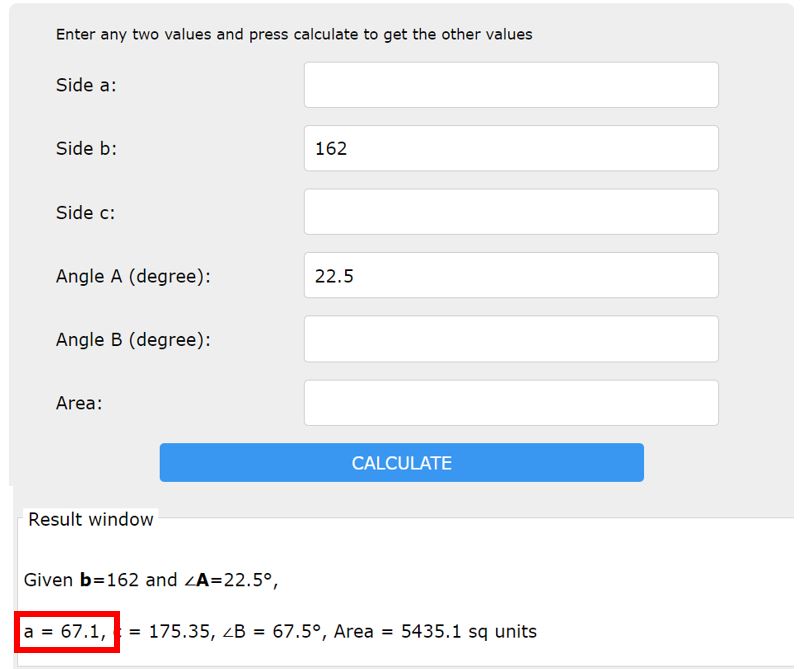
In looking at this example, with the center speaker in the exact middle of the wall, the left speaker should be 67.1” away from the center channel. The right speaker should be precisely the same distance in the opposite direction.
Surround Speakers
The next step is to figure out the location of the side and rear surround speakers. The angles for these speakers vary slightly between 5.1 and 7.1 speaker configurations. The Internation Telecommunications Union standard ITU-R BS. 775defines the layout for 5.1 surround configurations. The CTA/CEDIA CEB-22 Home Theater Audio Recommended Practice, written jointly by the Consumer Technology Association and CEDIA, define 7.1 surround sound configurations.
5.1 Surround
7.1 Surround
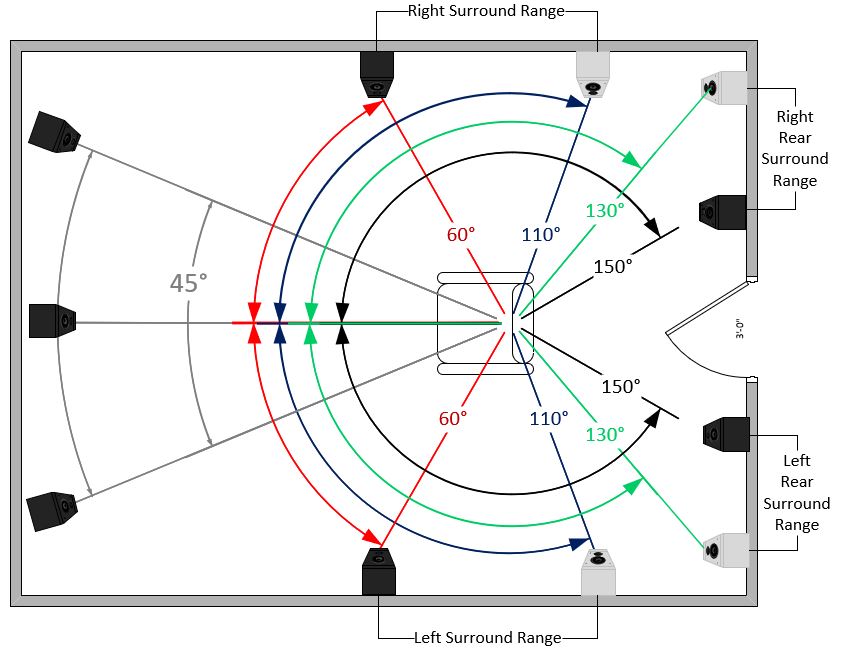
As you can see in figure 6, the angle of the side surrounds alter slightly between 5.1 and 7.1 surround configurations. For 5.1 surround sound, place the left or right speakers between 100° and 120° from the center speaker, putting the speakers slightly behind the listener. For 7.1 systems, the side surround speakers have a wider range, going from 60° up to 110°, which means the side surrounds can be slightly in front to slightly behind the listener. Side note: side surround speakers should not be perpendicular to the listener (90°) unless using either bi-pole or di-pole speakers. The range of angles for the rear surround speakers is between 130° and 150°.
There are a couple of points to pay attention to with surround speaker placement. First off is symmetry. Whenever possible, place the side speakers in the exact position on the opposite side. The rear speakers should be equidistant from each sidewall. The next point is surround speaker height. Surround sound height placement was standardized for years, only becoming contentious with the introduction of immersive audio formats.
When not installing immersive audio speakers, place the surround speakers approximately two feet above sitting ear height, which is generally 6 feet. The proper height when using immersive formats is a bit contentious as some state to place surround speakers at ear height, with tolerances up to 2 feet above ear height. Since most content today is not playing in an immersive format, elevating the surrounds makes sense. For more information on surround speaker height, refer to the website of the format you intend to use, such as Dolby Laboratories or DTS.
The last point to make on surround speakers regards aiming of the speakers. People often mistakenly aim surround sound speakers towards the MLP, which is not typical of a commercial theater or studio. Surround sound intends to provide ambient sounds that are not localizable. As such, surround speakers, both side and rear, should face the opposite wall. Doing so creates a sense of spaciousness more akin to how humans hear sounds behind us. Pointing surround speakers at the opposite wall provides a more exciting movie-watching experience.
Calculating surround speaker Distance
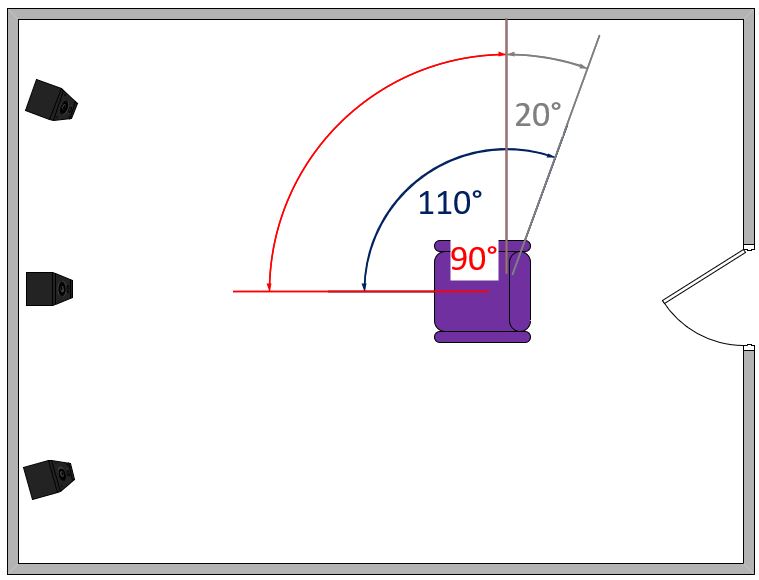
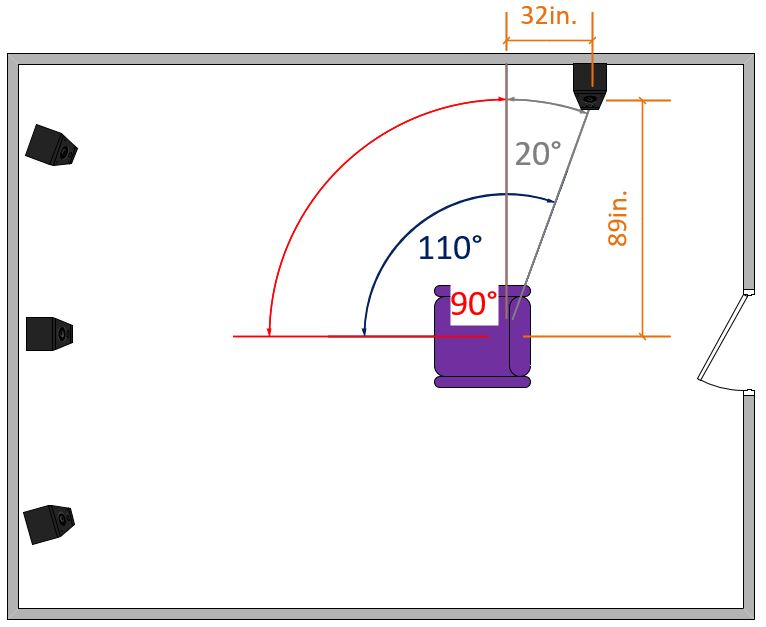
The process for calculating the distance for the surround speaker placement is very similar to left/right speaker calculations, with a caveat. Since the speakers are located on a separate wall, a bit of a trick makes it much easier to figure out. To do this, mark a spot on the sidewall, precisely 90° to the center speaker, as seen in figure 7.

Measure the distance from the mark on the wall, accounting for the depth of the speaker to the MLP. Write this distance down as “side b.” Next, figure out which angle you wish to use for your surround speakers and subtract 90°. In figure 8, we chose 110° as the surround sound angle, and thus “Angle A” is 20° (110-90=20).
Example 2: Side Surround Speakers
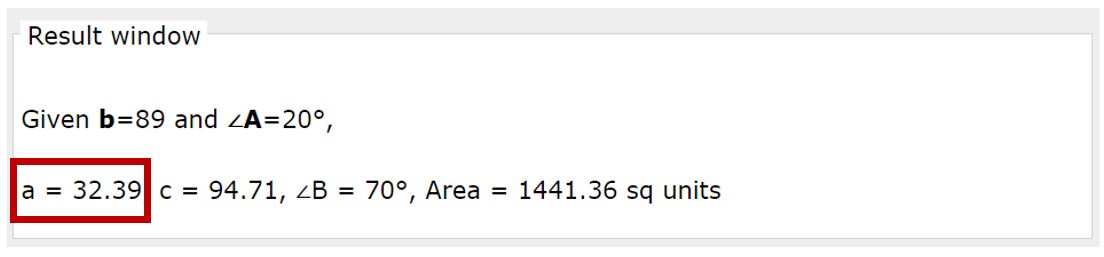
The distance between the MLP and the sidewall, including speaker depth is 89 inches. In a clean version of the right-angle calculator, enter 89 into the “side b” box. In sticking with a 110° angle from the center speaker, input 20 (110°-90°=20°) into the “Angle A” box and click calculate. The answer, as seen in Figure 10, is 32.39 inches.
Calculating rear surround speaker placement
Finally, we need to place the rear speakers. The process for determining rear speaker placement is very similar to the front left and right speakers, with the only difference being the angles. As stated early on in this article, the angle range for rear speakers is between 130° and 150°. Often, rear speaker placement is merely aligning the left and right rear speakers with the left and right front speakers. Most immersive audio formats suggest this layout.
The easiest way to figure out the speaker placement is by marking the centerline on the wall opposite. This mark is exactly 180° from the center speaker and should be identical to the center speaker. Measure the distance from the rear wall, accounting for speaker depth, to the MLP. This measurement is “side b.” Take the preferred angle and subtract it from 180°; this is “Angle A.” Enter “side b” and “Angle A” into the website to get the distance for each speaker.
Example 3: Rear Speaker Placement
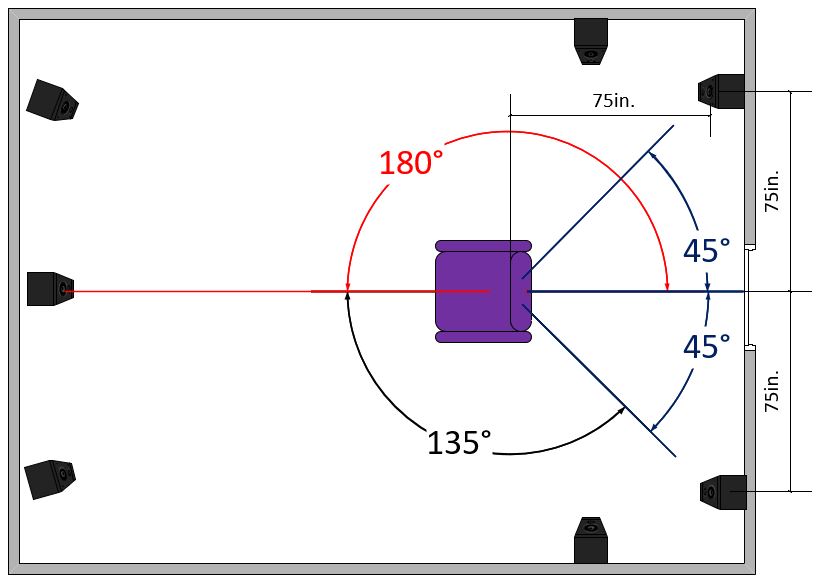
The distance from the rear speaker is 75 inches. Enter this as “side b.” The chosen angle of the rear speakers is 135°. Subtract the two angles, 180°-135° = 45°. Enter 45 as “Angle A” and hit calculate. The answer should show up as 75, which is your distance from the centerline to the rear surround speakers, as shown in figure 11.
Conclusion
The process for accurately laying out your home theater speakers, minus immersive audio, is now complete! If you have followed this process, your speaker layout now meets industry standards and is very similar to how movie studios edit their movies. The process may have seemed complicated or tedious, but once you get it, it is straightforward, yet highly accurate.
Placing home theater speakers in the correct position is often overlooked, yet is one of the most fundamental aspects of creating a high-performance home theater. Auralex Acoustics is passionate about helping people achieve the best results possible. For more information about Auralex Acoustics, please visit www.auralex.com or feel free to reach out to us at support@auralex.com or 1(800) 959-3343.